Campgrounds are RV-friendly, at least most of them. But when you are a full-time RVer and often travel from one place to another, you may find one or two campgrounds that require the campers to have extra sewer and water hoses to access these utilities. To stay in those sites, you must have an RV sewer hose storage to store the extra sewer hose.
Storing an additional water hose is easy. You can put it in a plastic bag and toss it inside the kitchen cabinet or anywhere else in the RV. But a 15- or 20-foot of slimy, stinky sewer hose is a different story. It definitely cannot go under your kitchen sink or anywhere inside the vehicle, right? The bumper is already occupied by the hose that comes with the RV. So, where to find another camper sewer hose storage?
Contents
RV Sewer Hose Storage Ideas
For the main RV sewer hose, RV vehicles come with storage in the bumper or near the backside. But it’s rare to find a trailer that provides a compartment for keeping a second sewer hose. You can’t stash two hoses into the built-in storage because it fits only one.
Here are a few suggestions about how to arrange for separate storage for the second sewer hose.
1. Make a Bucket Storage
Not the cleanest and most hygiene option, but a painter’s bucket is inexpensive. It provides a simple solution to an annoying and stinky (literally) problem.
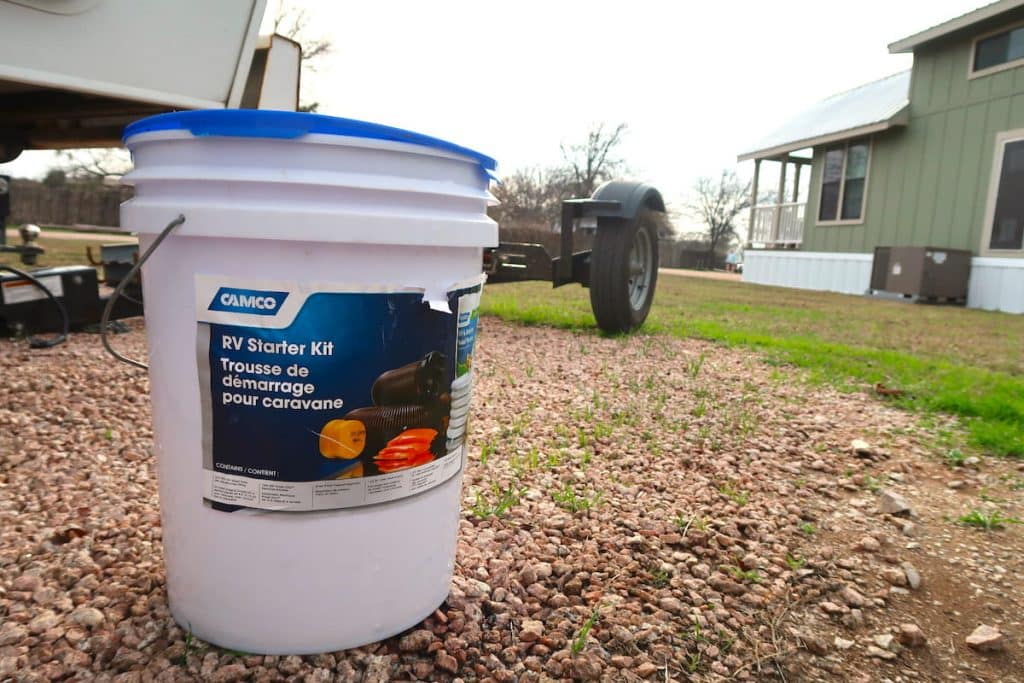
Before storing, drain off all the contents of the hose and give it a good rinse. There should not be any gunk sticking to the surface. After the washing, leave it under the sun for drying up completely.
Twirl the hose in a circle and tie with a rope as tightly as possible. Strong rubber bands will also work. Don’t forget to seal both ends with a cap or plastic bags and secure with fasteners like zip tie or rubber bands.
Put the curled hose into the bucket and close the lid. Store it somewhere far from the kitchen and living space. It’s not a good-looking storage container, nor 100% smell-proof, but it doesn’t cost much and doesn’t demand you to show your carpentry skill. It can also work as an emergency backup when an existing or makeshift storage place is damaged.
Don’t have a painter’s bucket at hand? Use a plastic bag. Yes, it sounds even worse but can be a lifesaver during an emergency. Of course, you should rinse the hose thoroughly before putting it in the bag.
2. Use a Store-Bought Storage Kit
Bucket storage does not have a seal as good as a commercial-grade sewer hose storage kit. If you want to spend some money, purchase a kit available in any retail shop like Amazon or Walmart. You can fit the kit near the dump valves or on the bumper (if it’s not occupied already).
Attach the storage to the bumper with hose clamps (if you don’t want to drill the bumper for putting screws). Handle carefully as the storage tube is soft and flexible.
3. DIY RV Sewer Hose Storage
Don’t want to buy a storage kit? A homemade RV sewer hose holder will work just fine if you can build it properly. It’s actually quite simple because retrofitting a PVC pipe or hollow fence post does not require any special skill. Follow these steps to make an RV sewer hose storage at your home:
Items You’ll Need
- 5×5 inches of plastic fence posts (or 4 or 6 inches of posts based on the size of your sewer hose)
- Two end caps
- Two eye hook bolts
- Coiled spring and snap closure
- Hose clamps
- L brackets, washers, and lock nuts
- Wrench and socket
- A Dremel tool
- A drill
The Procedure of Making an RV Sewer Hose Storage
Take a fence post and fix one end cap to its one side. Use PVC cement adhesive so that the attachment becomes permanent. The follow the next steps:
Drill holes for hooks.
After sealing one end, move to the other end and drill two holes opposite of each other and at least three inches away from the end. Put a threaded eye hook bolt in each hole. Keep the hook part outside and put the nut into the inner threaded part. Tighten them.
Cut the threaded part of the bolts a bit with a Dremel tool so that bolts don’t stick out inside the post.
Seal the other end.
Now, you need to attach the other end cap to the open part. It cannot be permanently fixed because you need to open up to dispose of the wastage inside.
However, you don’t need any complex tools as a coiled spring and a snap closure is enough to keep the cap secure to its place. Attach one end of the spring to one eye hook and connect the other end to the snap closure. Clip this closure to the second eye hook.
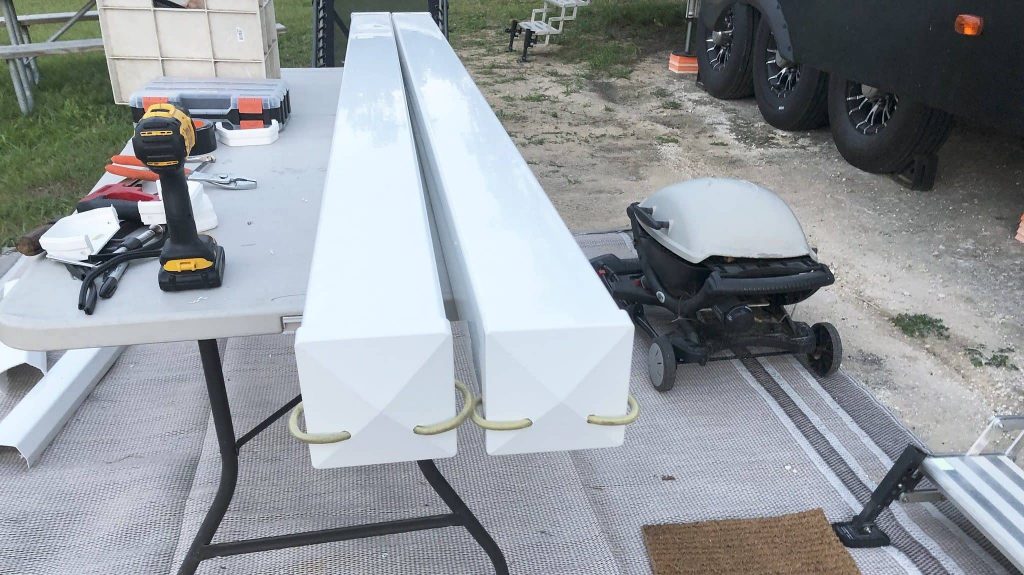
Mount the storage tube.
Now, it’s time to mount the storage tube to the dump valves, bumper, or any other suitable place. You can use hose clamps or L brackets to attach the fence post. If you use L brackets, put washers and lock nuts into the holes and tighten on both sides with a wrench and a socket. It will be better to cut the L brackets according to the size of the fence post.
Drill some holes for ventilation.
The last part is drilling some holes all across the fence post. These holes will dry out the moisture left in the sewer hose and the post when you drive.
This is how you make an RV sewer hose storage at home. Once you attach it to the desired area, place the sewer hose inside and lock the cap. Then, drive a little to see if the hose stays inside.