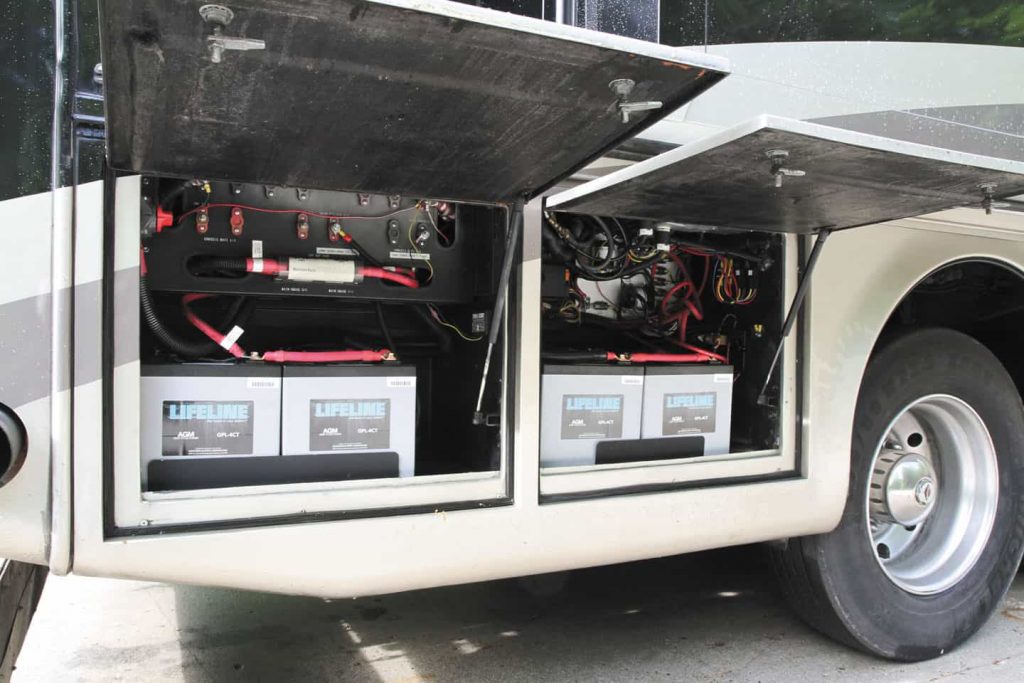
Deep cycle batteries, which are well suited for camping applications, are very different from regular starter batteries or cranking batteries used in most vehicles you see on the street. Naturally they require a different charging mechanism for optimal charging as well as lifespan.
Knowing how to charge a deep cycle battery properly with the appropriate charger is critical in ensuring optimal battery performance and lifespan, as well as making sure you can power your electrical appliances and enjoy your trip to the fullest.
While you might already know that you must not charge a deep cycle battery using a regular charger meant for your cranking battery, there are many nuances that you must understand fully to truly know how to charge a deep cycle battery properly.
This article will provide you with all the essential information so that you can get the most out of your deep cycle battery for many years to come, including how a deep cycle battery works differently from starting batteries, the safe charging mechanism and the different types of charger for this type of battery, the step by step guide on how to program and charge your battery, plus useful usage, safety and maintenance tips.
Contents
- How Deep Cycle Battery Differ From Regular Battery
- Why You Need To Charge a Deep Cycle Battery Properly
- Can You Charge A Deep Cycle Battery Using A Regular Charger?
- So How Do Deep Cycle Battery Chargers Work?
- How To Charge a Deep Cycle Battery Properly With a Deep Cycle Battery Charger
- Initial Programming for The Charger
- How To Charge a Deep Cycle Battery: The Safe & Efficient Process
- Safety Tips
- When To Charge
- Important Note: Charging Amperage
- Important Note: Charging Voltage
- Charging Time
- How To Tell If It’s Really Fully Charged
- Maintenance: Equalizing Charge
- If You’re In A Pinch: How To Charge a Deep Cycle Battery Using A Regular Charger
- More: Types Of Deep Cycle Battery Chargers
How Deep Cycle Battery Differ From Regular Battery
Many recreational vehicle and boat owners specifically choose deep cycle batteries for their intended applications for a number of reasons. Deep cycle batteries offer unique benefits, which directly relate to how they discharge and recharge, and thus they require special chargers to deliver the optimal charging, as well as maximizing the battery’s life.
Before we explain why you absolutely must get a deep cycle battery charger to efficiently charge your deep cycle batteries, not any regular charger, it will be easier to understand going forward if you grasp the basic differences between regular automotive starting batteries and deep cycle batteries.
Slow and Deep Discharge
The most common type of batteries most vehicles are equipped with are starting batteries or cranking batteries, also sometimes called “SLI” batteries, which stands for starting, lighting, ignition. Their purpose is to start and run a vehicle’s engines and to do this job, they typically deliver a very large starting current for a very short time in order to crank the engine.
As a result, only a small part of the starting battery is discharged, typically a shallow depth of discharge of only about 2% to 5% of the battery’s capacity. In normal starting use, starting batteries are designed to last for thousands of such shallow-discharge cycles. They are not designed for deep discharging and recharging, thus they will only last between 30 to 150 deep-discharge cycles.
In contrast, a deep cycle battery is a battery designed to handle many thousands of cycles of deep discharge and recharge over its lifetime. The capacity of the battery can be almost used up each time, without permanent damage to the battery, to a certain extent.
In addition to the depth of discharge, another key difference in comparison with starting batteries is the speed of discharge. Deep cycle batteries are also designed to discharge slowly, thereby providing steady power for several hours at a time instead of delivering an instant surge of high voltage for a very short time. This feature makes deep cycle batteries ideal for camping applications.
A typical cycle for a deep cycle battery would start at 100% capacity, followed by a deep discharge of between 20% and 50% of its capacity, and then recharge back to full capacity. While technically, it is possible to cycle the battery down to 20% without “killing” the battery right away, it is recommended by professionals and full-time campers to keep the average maximum discharge at around 45% to 50% to maximize the lifespan of the battery. Remember that the lifetime of your batteries will be influenced by their typical depth of discharge.
A battery with frequent cycles of 50% depth of discharge maximum will last longer than a battery that is often pushed to a greater depth of discharge. As a rough comparison, if a battery is discharged to about 50% every day, it will last about twice as long as if it is cycled to 80% depth of discharge.
While 50% is the safe lower limit, at the same time, there is also a safe upper limit. Note that for a deep cycle battery, repeated shallow discharge, that is around 5-10%, also shortens the battery lifespan, since it is not designed for such shallow cycles. At very shallow cycles, the lead dioxide tends to build up in clumps on the positive plates of the battery instead of forming an even film. This uneven build-up will continue after each recharging cycle and gradually will deteriorate the battery’s capacity to store a full charge and eventually cause premature replacement.
Structure
In terms of design or structure, the main difference between a deep cycle battery and a regular cranking battery is in their plates. In order to deliver short, high-current bursts to crank the engine, starting batteries have a large number of thin plates for maximum surface area with the electrolyte, and thus the electrolyte can penetrate the plates in a shorter time span for almost instant power. For maximum surface area, the lead plates are also made similar to a very fine foam sponge in appearance.
Meanwhile, deep cycle batteries have thicker active plates and thicker separators, or the insulating material in between the positive and the negative plates. The alloys used to create the plates in deep cycle batteries have more antimony than cranking batteries.
The benefit to having thicker plates is that they better resist a common problem called “positive grid corrosion” typically caused by extensive charge and discharge cycles. Such corrosion ranks among the top three reasons for battery failure. In other words, the thickness of the plates is directly related to the battery life. With all things being equal, the thicker the plates are, the longer the battery will last.
Charging Efficiency
In addition, the typical charging efficiency in a deep cycle battery is 85-95%, the very best can even approach 98%, which is much higher than that of regular starting batteries. The higher efficiency is a direct result of the lower internal resistance of the battery.
Much of the loss of battery efficiency is due to higher internal resistance at higher amperage rates, which occur with fast discharge and recharge. Therefore, as they are designed to discharge and recharge at a much slower rate, deep cycle batteries have up to 5 times lower internal resistance than standard starting batteries.
Why You Need To Charge a Deep Cycle Battery Properly
Then how to charge a deep cycle battery the right way for optimal charging efficiency and battery lifespan? By using a special charger engineered specifically for a deep cycle battery that caters for the distinctive characteristics of this type of battery.
A deep cycle battery charger, also called a deep cell battery charger, is recommended to maintain the cycle of deep discharge and recharge of a deep cycle battery.
READ MORE:
Can You Charge A Deep Cycle Battery Using A Regular Charger?
This is the first question asked by vehicle owners. Using a regular battery charger to charge your deep cycle battery is not at all recommended, however if you absolutely must in a pinch, this can be done. Do note that your deep cycle battery would not reach a full charge even if it indicates so, and do not be tempted to do this again if you don’t want to permanently damage your deep cycle battery.
The Correct Way: Using A Deep Cycle Battery Charger
Using the right type of charger for each specific type of battery is always optimal in a number of aspects as follows:
Extend The Lifespan Of Batteries
Premature battery death is annoying, and replacing an old battery can be a time-consuming process. That said, although nothing lasts forever, you will enjoy optimal efficiency as well as a maximized lifespan from your deep cycle batteries if you charge your batteries with the best deep cycle battery charger.
Keep Electrical Appliances Running
With a quality deep cycle battery charger by your side while traveling off-grid, you should have an easy time keeping the battery bank of your RV fully charged and powering all your electrical appliances. After all, there is no need to sacrifice basic amenities and comfort while you’re in the wild.
Keep Electrical Parts Healthy
When you have a depleted battery, your vehicle ends up putting additional stress on the charging system, that is the alternator and the starter motor, by drawing excessive voltage to compensate for the lack of battery power. This can cause these electrical parts to malfunction–typically without warning. Therefore, having the best deep cycle battery charger at hand, as well as a simple toolI–a voltmeter, will allow you to regularly test and charge your batteries as needed and avoid expensive repairs.
Battery Conditioning
Another critical function of a quality 12 volt deep cycle battery charger is battery conditioning. This maintenance process helps keep your deep cycle battery extra healthy while it is plugged into the charger. Better yet, you can look for a smart charger that includes testing lights so that you can visually monitor your battery’s condition during charging.
Meanwhile, a traditional battery charger may not be set up with the right technology for this job.
So How Do Deep Cycle Battery Chargers Work?
Charging Speed & The Resulting Heat
The biggest difference between regular battery chargers and deep cycle chargers is the speed at which they charge. Firstly, using a regular battery charger to charge a deep cycle battery is not recommended, since a regular charger will charge the battery quickly at higher amperage rates, and as noted above, will result in high internal resistance and low charging efficiency.
High internal resistance will manifest itself as excessive heat, which is detrimental to the health and lifespan of a deep cycle battery not designed to handle such heat. A deep cycle battery may never reach full capacity when charged with a regular charger. Instead, it will show that it is fully charged long before it actually reaches full capacity.
Secondly, a fast charge will not allow the battery a sufficient amount of time for the electrolyte to penetrate the thicker plates of a deep cycle battery. Meanwhile, a deep cycle battery chargers are designed to charge batteries at a much lower rate, thus allowing enough time for the battery acid to penetrate the plates while not damaging them.
In contrast, a slow charge is ideal for charging deep cycle batteries because it minimizes internal resistance, prevents excessive heat buildup and ensures optimal charging capacity and thus allowing the battery to effectively reach its full capacity.
In addition, the slow charging process of the best deep cycle battery charger will maximize the battery lifespan. It does this by avoiding overheating the deep cycle battery, which can cause various problems such as internal materials slowly breaking down, fluctuating charging times and operational times, and ultimately shorter battery lifespan.
Charging Phases
Regular battery charge batteries from start to finish in one go and the charging current remains essentially constant throughout the process. Once max capacity is reached, regular battery chargers would automatically shut down.
In contrast, a deep cycle battery charger charges the battery in three distinct stages and each requires a different optimal charging current. This stepped model allows more current to flow to the battery when it is deeply discharged in the first stage, and then in the later stages, slowly tapers off the charging speed as the battery reaches full capacity. This serves to optimize charging time while maximizing the life of the battery in the long run.
In addition, once full capacity is reached, deep cycle battery chargers go into float mode to tackle self-discharge. That is why deep cycle battery chargers could keep batteries at full charge for a longer time.
Overcharging
Overcharging is needless to say harmful for both charging efficiency and the battery’s lifespan. The best deep cycle battery charger will also help protect against overcharging, so you can leave the charger plugged in 24/7 without worry of damaging the battery.
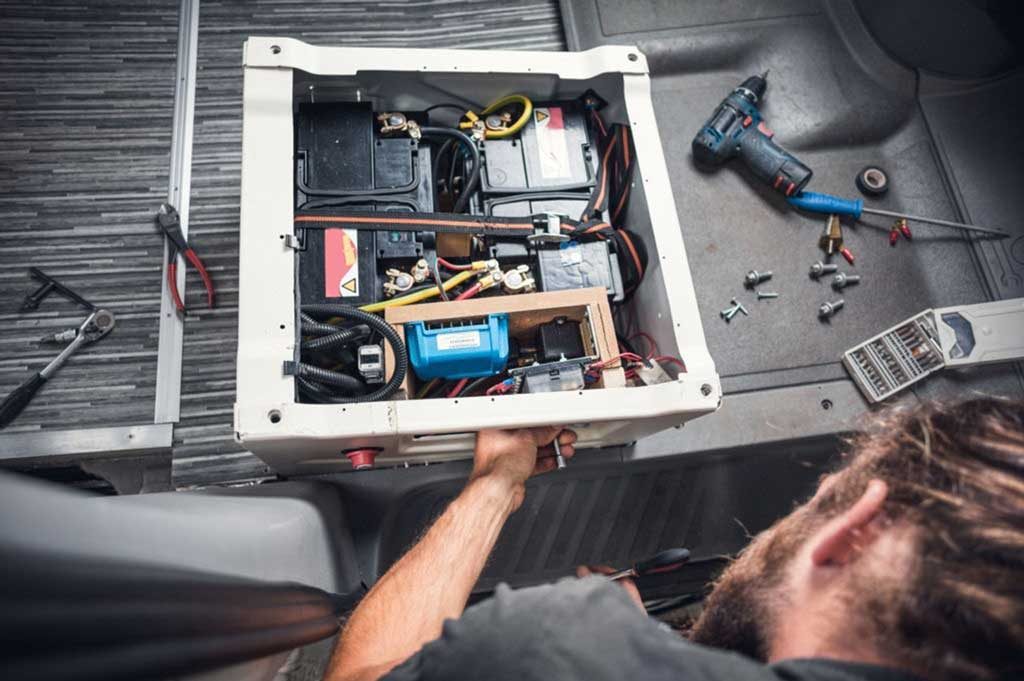
How To Charge a Deep Cycle Battery Properly With a Deep Cycle Battery Charger
There are a number of things you must not ignore when charging a deep cycle battery, an absolutely crucial task of which is initial programming. Follow the steps down below and you would be able to safely and efficiently bring your battery to full charge as well get more life out of your battery pack.
Initial Programming for The Charger
The first time you bring your system online, depending on the model, you might need to program your chargers to the proper charging settings best suited for your battery bank. These settings dictate parameters like charging voltage and current. Refer to the manuals for your batteries and chargers for these specific settings.
Initial programming is crucial, since this is how you program “voltage set points”, or the different charging voltages that the battery will receive during each stage of the charging cycle. It is important to note that batteries typically charge in 3 stages—bulk, absorb, and float. Each stage requires the charger to be set at a specific voltage for optimal charging, which is based on the requirements of your specific battery pack:
- Bulk: The first stage is characterized by a faster charge rate to bring voltage up as quickly as possible, so that a depleted battery will receive high current to quickly replenish. The battery will be recharged up to 80% of its capacity.
- Absorb: The battery will continue to be recharged to its full state of charge with a slower charge rate.
- Float: After full capacity is reached, the batteries will receive a trickle charge to maintain this full state of charge. In other words, the charge rate in the float stage is equal to the battery’s natural self-discharge rate.
As such, programming the voltage set points accurately for these three charging stages is absolutely critical to ensuring your batteries’ ability to hold a full charge, its overall long-term health and lifespan. Setting the wrong parameters will make your batteries charge at suboptimal conditions, thus inevitably shortening their lifespan.
There are also other important values to set during the initial programming, which are different for every battery and charger. Check the manuals for your batteries and chargers to find the specific values for each setting:
- Max charge rate or charge current limit: Maximum charging current, either expressed as maximum charging amps or a percentage of the charger output. This setting is used to make sure your batteries are not overcharged with too much current, which will cause overheating and shorten battery lifespan.
- Temperature compensation: The best deep cycle battery chargers include a battery temperature sensor and allow for adjustments for operation in various temperature ranges.
- Absorb time: The amount of time the charger spends in the absorb phase.
- AC input amps: The maximum input current from the generator is dependent on generator size, and ensures that the combined current from the battery charger and loads doesn’t exceed the rating of the generator.
How To Charge a Deep Cycle Battery: The Safe & Efficient Process
Step 1 – Preparation
Put on goggles and protective gloves for protection, since sulfides might escape from the battery during the charging process.
Safety first: Disconnect the battery from your boat’ or RV’s system and bring it to a well-ventilated space to avoid a surge or electrical damage. Be aware of gas release by the battery. It is best to inspect and charge the battery where the gas can safely dissipate outdoors.
Step 2 – Inspect water level
Most deep cycle batteries have water within their construction. Before you begin with a charging session, regularly inspect the battery for proper electrolyte levels for that battery type.
Use a screwdriver to remove the covers of the cells to check the liquid level and add distilled water if needed. While you’re at it, also inspect to see if there are cracks on the outside housing.
Step 3 – Clean battery terminals
The buildup of sulfuric acid residue naturally occurs over time and may leave behind a yellow-ish powder on the battery terminals. Next, you should clean the battery terminals before attaching the clamps using a wire brush to make sure you get a good clean charge without interference.
Afterward, spray the terminals with an anti-corrosion spray. Only plug in the battery charger when the spray is completely dry, or else this might ignite the battery.
Step 4 – Check state of discharge
Before actually starting charging, you must check the current state of discharge of the battery. The state of discharge on a battery that’s been under a load for most of the day would typically be between 25% and 30% full.
Use a voltmeter with the battery detached from the system to read the voltage of the battery. This state of discharge will partly decide how long you should be charging deep cycle battery components. Refer to your battery manual for a chart that estimates the battery’s state of discharge based on the voltage readings.
To get the most accurate voltage reading, your batteries should be tested in a resting state, that is no charging or discharging, for at least 2 hours before using the voltmeter. Using the voltmeter when batteries are being charged or discharged is going to result in a misleading higher or lower voltage, depending on the load.
Getting the best deep cycle battery chargers is convenient regarding this matter along with others: a smart charger will determine the current charge and the right timing to top it off, so there’s no need to determine the state of discharge and the right charging time.
Step 5 – Set a timer
In case you don’t own a smart charger, it’s crucial that you set a timer for the charging session to avoid overcharging. Overcharging will overheat the battery, thus diminishing their charging capacity and lifespan.
The time it takes to properly charge a battery depends on its current state of discharge as well as your charger’s amperage specification, which can be found in the manuals. For easy calculations, refer to the charts provided by your battery and charger’s manufacturer, either in the manuals or on their websites.
As stated above, a charger with a higher amps output will deliver a faster charge. As a rough comparison, a charger with 15 amps will take about two hours to fully charge a battery at a 25% state of discharge, while one with only 5 amps will need six hours to do the job.
Step 6 – Charging
Set the charger to match the type, that is flooded, gel or AGM, and characteristics of your battery. Next, connect the cables of the chargers to the terminals of the battery: Clip the red clamp to the positive terminal (+ symbol), then clip the black clamp to the negative terminal (– symbol).
After connecting the cables, connect the charge to the power outlet (110-120 volts AC). Turn on the charger and start the charging.
Step 5
Once the battery is fully charged, the charger would display some kind of notification. Remove the cables and check the voltage of the battery. If all is well and the battery is fully charged, you may reinstall the battery in your RV or boat.
If your batteries fail to approach full charge, they are likely defective, damaged, or have simply reached old age and require replacement.
Safety Tips
- Before starting your charging sessions, always make sure to remove the key from the ignition and switch off all lights and electrical circuits connecting the battery charger.
- Never put on a battery charger while the battery or the terminals are wet. This can ignite the battery or cause a spark.
- Do not clamp the positive cable to the negative battery terminal or vice versa. They are color-coded with corresponding symbols for easy identification.
- Keep the battery and charger away from extreme heat or cold, as both aren’t ideal for the battery’ and the charger’s components. You may notice fluctuations in charging times when it’s too hot or cold.
- Note: While you do get a small short charge with a jumpstart and can leave the engine running for a time with a jump, it won’t be a permanent solution, and not the optimal choice considering the health and lifespan of your batteries. Invest in the best deep cycle battery chargers to save yourself time and money on troubleshooting, repair and battery replacement later on.
Related:
When To Charge
Deep cycle batteries should be recharged when they indicate a 45-50% charge, but the best practice is to never let them get lower than 20% to ensure a long life, although deep cycle batteries are technically designed to withstand a 80% depth of discharge. Use a multimeter or a voltmeter to regularly check the state of discharge of your battery, or how many voltages your battery is currently holding.
Depending on your power consumption, you will need to regularly check the voltage of your battery using a voltmeter to determine when you need to charge your battery and estimate for yourself the average time that it takes for your battery to cycle down to 45% of its full capacity.
Do note that all types of deep cycle batteries are lead-acid batteries, thus they run the risk of sulfation if left uncharged for too long. Sulfation, the process of lead sulfate crystals building up on a battery cell, is a natural process that happens with every battery over time. However, rapid sulfation happens when deep cycle batteries are stored in a discharge state, or left on the shelf for too long, and it is undesirable. The battery will accept far less current than normal.
When rapid sulfation occurs, during a charging session, the battery will usually start to accept increasing amounts of current until a normal current level is reached. If there is no response even to higher charge voltages than recommended levels, the battery may have been in a discharged state for too long to recover and thus needs to be replaced.
Important Note: Charging Amperage
Always refer to the manuals to check your battery and charger’s specifications for the accurate proper charge rate. In general, it is typically better to charge a deep cycle battery at a higher charge rate like 6-amps, 10-amps or 15 amps.
There are times when charging a battery quicker is desirable. This is possible to do by increasing the amperage charge up to 20 amps from 10-15 amps that it starts at.
However, be aware that anything out of the ordinary specified in the manuals will shorten the useful life of your deep cycle battery. If you prioritize fast charging time, you can invest in the best deep cycle battery charger that has improved circuitry; this can manage current in an optimal way for a faster charge without deteriorating the battery in the long run.
Sometimes when needed, you can fast charge a deep cycle battery by increasing the amperage charge up to 20 amps from the typical and recommended 10-15 amps that it starts at. However, be aware that doing anything out of the ordinary will most likely shorten the useful life of your deep cycle battery, so only do this when circumstances absolutely require.
Important Note: Charging Voltage
This depends on the type of deep cycle battery your vehicle has and the specific model, so always read the manual carefully to properly charge your battery and take care of your charger.
If you use a charge voltage that is too high, the battery will overheat, leading to premature death. In addition, excessive current will flow into the battery after it has reached 100%, causing decomposition of water in the electrolyte and premature aging.
Also remember that each of the three charging stages of a deep cycle battery requires a different voltage, which you must set during the initial programming phase.
For instance, flooded deep cycle batteries require a recharging voltage of 2.43 to 2.45 volts per cell. This is 14.6/14.7 volts for a 12 volt nominal installation and 29.2/29.4 volts in a 24 volt site.
Meanwhile, AGM batteries should be charged using a charger with current limited to 20% or 0.2C of the batteries capacity at a charging voltage of between 14.6 – 14.8 volts following deep cycle use, or 13.6 – 13.8 volts for standby use.
Charging Time
The time required to charge your deep cycle battery system will depend on the number of battery banks that need to be charged, and the number of amps-per-bank that your charger can output. The atmospheric temperature also slightly affects charging time; charging time can noticeably fluctuate in extremely hot or cold weather.
You can estimate charging time by dividing the battery’s capacity by the charger’s rating, and a good rule of thumb is to add about 10% for the extra time to totally top off the battery. For instance, It would take a 10-amp charger about 11 hours to recharge a dead 100 ampere-hour deep cycle battery to near 100% full charge at room temperature: 100AH ÷ 10A × 110% = 11 hours.
In general, many experts recommend charging the battery slowly over a 10-20-hour period at a moderate room temperature of 70°F or 21°C, given that your charger has damage protections in place and can be left plugged in 24/7. This way, the acid has plenty of time to penetrate the thicker active plates while also putting far less stress on the plates..
Sometimes, when you’re in a hurry and need to reduce charging time, one way is to only charge the battery up to 90%. This is because getting from 90% to a 100% full charge takes considerably longer than getting from 80% to 90%, extending the total charging time by a lot. However, do note that it is optimal for battery life to discharge down to 45% then recharged to full capacity, so charging to only 90% often will surely shorten your battery life.
How To Tell If It’s Really Fully Charged
The best deep cycle battery charger will have some form of notification to tell you when the battery is fully charged and ready to be reinstalled and used. Otherwise, you can use a voltmeter or a multimeter to measure the current voltage the battery is holding to check whether it has reached 100% charge.
A 12-volt deep cycle battery has 6 individual cells, and thus each cell holds approximately 2 volts. Interestingly, a fully charged 2-volt cell has a voltage of approximately 2.15 volts while a fully discharged 2 volt cell has a voltage of 1.9 volts.
That’s only a difference of 0.25 volt per cell between fully-charged to fully-discharged states. In other words, a 12-volt battery will measure at about 12.9 volts when it’s fully charged and about 11.4 volts when it is fully discharged. The exact fully-charged voltage and fully-discharged voltage will be slightly different depending on the specific type of the battery and its age.
To check if a 12 volt deep cycle battery charger has charged a battery to 100% charge, follow these steps:
- Let the vehicle rest for at least two hours, or best overnight, before you use the multimeter to test the battery’s state of charge. If the vehicle has recently been running, the battery is likely to produce a higher misleading number on the multimeter.
- Insert the red lead for the voltmeter into the connector identified as “volts”, and the black lead into the connector marked as “com”.
- Turn the switch on the meter to the position of “DC volts.” Set your multimeter to 20 DC voltage.
- Connect the multimeter with the battery: Touch the red lead (positive, marked “+”) with the red (positive) battery terminal. Touch the black lead (negative, marked “-”) with the black (negative) battery terminal.
- Read the DC-volt value on the multimeter’s display.
Maintenance: Equalizing Charge
Do note that sometimes a controlled overcharged is desired as a means of battery maintenance. While this is not required for sealed deep cycle batteries, flooded lead acid batteries should be equalized occasionally to make sure each cell is equally charged. You can do this by applying a controlled overcharge once every 30-90 days, or whenever individual batteries are imbalanced, that is they are reading a different voltage.
The process for an equalizing controlled overcharge is as follows:
- Check water level before initiating an equalize charge.
- Turn off any loads.
- Set your charger at the Equalize voltage specified in your battery manual.
- Start the Equalize charge. Gassing and bubbling is normal during this process.
- Stop charging and take specific gravity readings every hour. The EQ process is complete when the specific gravity stops rising.
If You’re In A Pinch: How To Charge a Deep Cycle Battery Using A Regular Charger
Again, using a regular battery charger to charge your deep cycle battery is not at all recommended, however if you must, the process is the same. Do note that your deep cycle battery would not reach a full charge.

- Put on goggles and protective gloves for protection.
- Disconnect the battery from your boat or RV’s system and bring it to a well-ventilated space, so the gas released by the battery can safely dissipate outdoors.
- a screwdriver to remove the covers of the cells and check the electrolyte level. If the electrolyte level appears to be low, proceed to add distilled water.
- To make sure you get a good clean charge without interference, before attaching the clamps, you should clean away any sulfuric acid residue from the terminals using a wire brush. Then, spray them with an anti-corrosion spray. Wait until the spray is dry.
- If your charger is not a smart charger with an auto-stop function that will top it off when the battery is full, check the current state of discharge of the battery by using a voltmeter to read the battery’s voltage. The state of discharge will dictate how long you should be charging. Refer to online charts provided by your battery and charger’s manufacturer to calculate charging time. Then, set a timer.
- Set the charger to match the type of your deep cycle battery. Next, connect the red clamp of the chargers to the positive terminal (+ symbol) of the battery, then clip the black clamp to the negative terminal (– symbol).
- Connect the charge to the power outlet. Turn on the charger.
- Even if the charger notifies you that the battery is fully charged, a deep cycle battery will not reach a full charge with a regular charger. Remove the cables and reinstall the battery
More: Types Of Deep Cycle Battery Chargers
Using operational characteristics, it’s possible to split RV deep cycle battery chargers into three types: charger, restorer and maintainer
Deep Cycle Battery Chargers: Basic and practical, battery chargers simply deliver power to the batteries and get them back to full charge, even if it is completely out of juice. These are the most common types of battery chargers, and their universal fit makes them capable of providing the correct amperage to your vehicle no matter if it has a marine battery, AGM battery, gel battery, or any other type of battery. Being highly adaptable, models of the type consistently give a splendid account of themselves in a wide range of arrangements.
Deep Cycle Battery Restorers: As a more expensive type of charger, restorers are seen more in professional garages or shops than in the homes. Engineered to break up accumulations of foreign contaminants in the battery cells, which obstructs the flow of charge, the best deep cycle battery restorer can clear the cell block out and bring power to your battery once again. Battery restorers prove to be excellent choices for well-used batteries.
Deep Cycle Battery Maintainers: Batteries are prone to the problem called natural discharge or self-discharge, in which internal chemical reactions reduce the stored charge of the battery without any connection between the electrodes or any external circuit. With the ability to keep power in the cells from self-discharging, battery maintainers could keep batteries at full charge for a long time. Naturally, models of the type get a shower of praise from RVers that travel extensively. They work best as quick fixes and may help extend the battery life.